VuePress2详细安装流程
介绍
VuePress 是一个以 Markdown 为中心的静态网站生成器。你可以使用 Markdown 来书写内容(如文档、博客等),然后 VuePress 会帮助你生成一个静态网站来展示它们。
VuePress 诞生的初衷是为了支持 Vue.js 及其子项目的文档需求,但是现在它已经在帮助大量用户构建他们的文档、博客和其他静态网站。
依赖环境
提示
使用 pnpm 时,你可能需要安装
vue和@vuepress/client作为peer-dependencies,即pnpm add -D vue @vuepress/client@next。使用 yarn 2 时,你需要在
.yarnrc.yml文件中设置nodeLinker: 'node-modules'。
安装
最新的安装流程,请参考官方文档
本篇文章以Ubuntu 22.04 进行演示。
步骤 1: 创建并进入一个新目录
1 | mkdir vuepress-starter #名称自定 |
我这边把这个目录放在了
/var/www/
步骤 2: 初始化项目
1 | git init |
步骤 3: 将 VuePress 安装为本地依赖
1 | npm install -D vuepress@next |

不推荐
-g全局安装
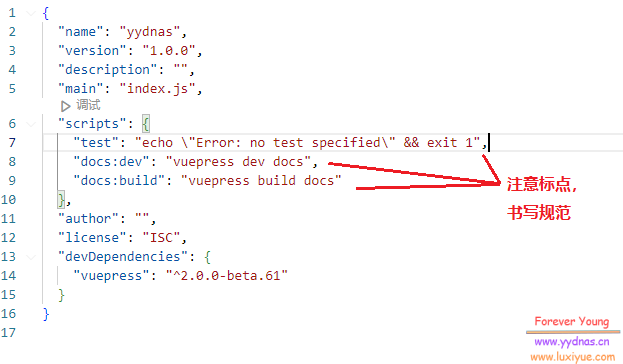
步骤 4: 在 package.json 中添加一些 scripts
1 | { |
步骤 5: 将默认的临时目录和缓存目录添加到 .gitignore 文件中
1 | echo 'node_modules' >> .gitignore |
步骤 6: 创建你的第一篇文档
1 | mkdir docs |
步骤 7: 在本地启动服务器来开发你的文档网站
1 | npm run docs:dev |
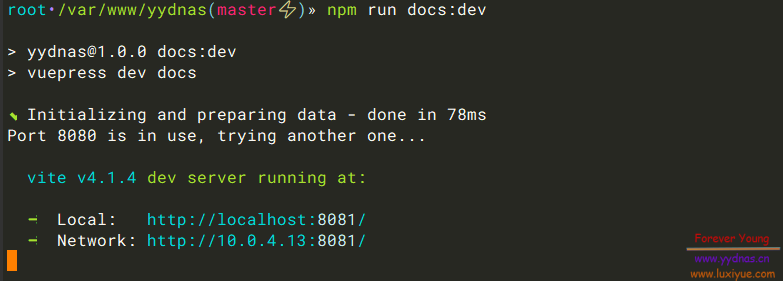
VuePress 会在 http://localhost:8080 启动一个热重载的开发服务器。当你修改你的 Markdown 文件时,浏览器中的内容也会自动更新。
我这边是因为
8080端口被其他程序占用了,它自动更改到8081。到这里其实已经完成基本的安装了,如果需要配置反向代理的话,下面是一个简单的Nginx反向代理示例:
2
3
4
5
6
7
8
9
10
11
12
listen 80;
listen [::]:80;
server_name vuepress.yydnas.cn
location / {
proxy_set_header Host $http_host;
proxy_set_header X-Real-IP $remote_addr;
proxy_set_header X-Scheme $scheme;
proxy_pass http://localhost:8080/;
}
>}

保持后台运行
通过 npm run docs:dev 命令运行后,终端是无法关闭的,关闭后进程也就停止服务。
然后想到既然是node服务器,那么我应该可以通过pm2的方式来运行它:
1. 安装pm2
1 | npm install -g pm2 |
2. 配置 run-vuepress.js
配置这个启动文件的方式有很多,这个算是最简单的一个了
1 | cd /path/to/vuepress |
内容如下:
1 | //run |
3. 运行
1 | pm2 start /path/to/vuepress/run-vuepress.js |

最后
这篇文章只是第一步简单的安装,但是后续的使用还有很多需要配置的东西,后续会单独再写一篇文章,介绍一下Vuepress的详细配置以及使用。
